We accept:


FAQs
Select a set of FAQs to find out more!
Grass Seed FAQs
There's a lot to learn about grass seed. We've answeed your most asked questions below!
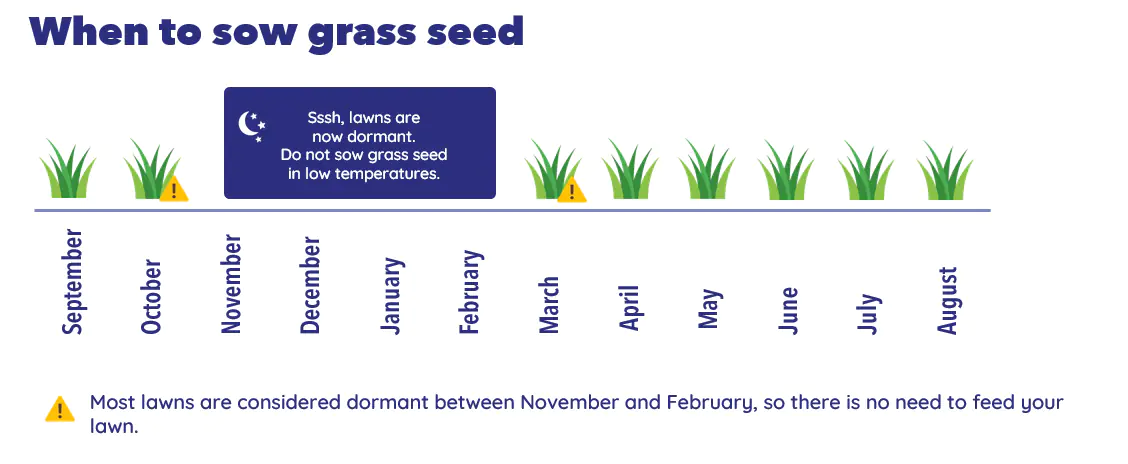
When should I sow grass seed?
You can sow grass seed when temperatures are 10 degrees and above consistently during the day and at night. Before sowing, check these temperatures are forecast in your area for at least two weeks. Do not sow in flood, frost, snow or extremely hot conditions. With this in mind, typically the best times to sow are Spring or Autumn, and in most parts of the UK you can confidently sow from April right through to September.
How do I sow a new lawn?
The best way to learn how to sow a new lawn is by using our video guide / step by step pictorial guide. You can also scan the QR code on the back of your bag that will take you directly to our How To Hub.
How to overseed an existing lawn?
Learn how to overseed a new lawn by using our how to overseed a lawn video guide. You can also scan the QR code on the back of your bag that will take you directly to our How To Hub.
How to prepare your soil for new seed
A perfect seedbed should be five things; free of weeds and moss, stones or debris, and easy to rake through and level. You will achieve the perfect lawn if you have achieved these five things! Click below to read more about achieving the perfect seedbed for your grass seed.
How do I remove weeds and moss?
Weeds and moss can appear on your lawn at any time. Even the best cared-for lawn can have the odd weed. Weeds and moss can be removed in various ways, so keep reading for more information on how to remove weeds and moss from your lawn!
How to repair patches
Wear and tear is a natural occurrence in any lawn that gets a lot of use, causing patchy grass or creating bald spots in your lawn. But if the rest of your lawn is in good condition and only a few areas need a little help – it’s easy enough to do a quick repair! Knowing how to repair patches in your lawn is the quickest way to get your garden grass healthy and lush again!
What grass seed should I sow?
How much grass seed do I need?
We have a handy product calculator to help you find out how much grass seed, lawn food, and wildflower seed you need for your garden. All you need to do is measure the length and width of your garden (in metres) and enter them into our product calculator. We also have a product calculator on the right-hand side of each product page on our website.
What grass seed is the best for overseeding?
The best grass seed for overseeding your lawn is the one that has been created with your lawn’s needs at the top of the list. Overseeding is a good opportunity to regain that lush lawn, repairing any patchy or tired-looking grass that may have emerged from any tough love your garden has been through. Click below for our guide on choosing the best grass seed for overseeding:
What spreader setting should I use?
Spreaders are a great way to ensure even coverage while overseeding or sowing a new lawn so you can avoid patchiness. They are also extremely helpful for applying lawn food to help minimise fertiliser burn and to make sure all areas receive the same amount of product. We have a guide on choosing the best spreader settings to ensure your garden gets the coverage it needs to grow thick and lush:
Do I need to use lawn feed before seeding?
Setting your seed up with the best foundation for growth will go a long way to producing the perfect lawn. Our Pre-Seed First Feed is packed with all the nutrients your lawn needs to accelerate the growth of new seedlings and get your ultimate lawn well underway! Due to its fast-acting nature, this lawn food is also perfect for fixing up wear and tear patches and can be used as a general lawn feed from March to September. For sowing a new lawn or overseeding an existing one, our Pre-Seed First Feed contains all the necessary nutrients to get your new grass off to a flying start.
Do I need to aerate my lawn before seeding?
When you aerate your lawn, you create pockets of air in the soil that helps to break up this compaction and allows nutrients, water and oxygen to flow again, improving the health and overall look of your lawn. Essentially, you're allowing your lawn to ‘breathe’, which works wonders for how it looks in the long run.
Growing & Watering
How long does grass take to grow?
Most grass seed will sprout within 10 days of being sown – if sown in the correct conditions for growth. This means sowing when temperatures are 10 degrees and above, with good weather forecast for the following two weeks.
How long will it take for my lawn to be fully grown?
If sown in the correct conditions, your lawn should be fully grown at the 6-8 week mark when your grass is hitting heights of 5 – 7cm.
How often should I water my lawn?
You should water a newly sown lawn once a day, everyday, for 6 weeks avoiding when it is raining. Our UK weather will do a good job of watering an existing lawn for most of the year – but during a drought you should aim to water deeply between 10-14 days apart to help your grass’ root system to build resilience.
Do I need to use top soil before seeding?
Having a stunning, lush lawn adds tremendous charm and beauty to any garden. Whether you’re starting from scratch or looking to revive your existing lawn, sowing grass seed is a cost-effective and efficient way to achieve a thriving and vibrant garden lawn. In our how to sow grass seed guide, we walk you through the step-by-step process, ensuring you have all the necessary information to get your grass seeds growing as best they can from day one!
How long does grass seed take to grow?
Most grass seed will sprout within ten days of being sown – if sown in the correct conditions for growth. This means sowing when temperatures are 10 degrees and above, with good weather forecast for the following two weeks. Keep reading for some helpful advice and the answer to the common question - "how long does grass take to grow".
How often should I water my new seed?
You should aim to water your new lawn every day for the first six weeks from when you’ve planted your seeds. This six-week period is how long it takes for your grass to grow fully, and it will be ready for its first mow afterwards! You can hold off watering on days when it's forecast to rain outside.
When will my lawn be ready for its first mow?
Customers often ask us "when to mow new grass", and the answer is simple. Giving your seedlings at least six weeks to grow before approaching them with your mower is best.
How do I tackle weeds in my newly seeded lawn?
Even the best cared-for lawn can show signs of weeds sprouting without warning. Weeds appearing can be even more surprising when you have done all the prep work when sowing your seeds. However, controlling these unexpected visitors is not difficult! So, keep reading and discover a few easy ways to remove weeds and moss from your newly seeded lawn.
When should I start mowing my lawn?
This is when you will dust the cobwebs off your lawnmower from winter and give your lawn its first mow of the year, usually around mid-March. From there on, you should aim to mow your lawn at least once a week.
Mowing & Aftercare
What height should I mow my lawn at, and does it matter?
You can mow your lawn at any height you like, but its best to follow a guide to keep your grass healthy. Cutting your lawn too short can damage it, and letting it grow too long can encourage weeds and disease to take hold. If your lawn gets a lot of use, you should mow at 20-40mm to keep it long and lush. For a finer lawn that’s just for show, you can mow shorter at 10-20mm. Regardless of what type of lawn you have, your first mow (spring) and last mow of the season (autumn) should be on the highest setting on your lawnmower.
How often should I mow my lawn?
From late February onwards your grass will resume growth and you may be wondering how often you should mow your lawn. In Spring and Summer you should aim to cut your lawn once a week. Cutting your grass too often and too short can stress it, so try to avoid this and enjoy your lawn between mows.
When should I mow my new lawn?
You should wait 6-8 weeks before mowing a new lawn, when your new grass is hitting heights of 5-7cm. Always cut new grass on the highest setting of your lawn mower before gradually reducing to your preferred mowing height. For general use lawns, aim to mow you grass at 20-40mm. For fine ornamental lawns, keep your height at 10-20mm.
What height should I mow my lawn at?
We recommend letting your grass grow to around 50-70mm before cutting it (about the height of your ankle) – and this applies to all our grass seed products. However, it isn't ready for cutting if it hasn't reached this height after six to eight weeks. This slow growth could be due to a lack of soil nutrients, an unexpected weather change, or you may have sown your seed too deep into the soil.
What lawnmower should I use?
It comes down to rotary vs cylinder mowers when deciding what is best. Your pick of the two comes down to what sort of cut you want your lawn to achieve and how much time you have on your hands!
When should I stop mowing my lawn?
Just as the sowing season comes to an end from October onwards, so does the mowing season. If you find your lawn needing a trim, mow on the highest setting, avoiding times when the soil is too soft or frozen, as this will damage your lawn. Once temperatures have dropped and grass growth has stalled, you can tuck your mower away for another season.
How do I stripe my lawn?
You can achieve lawn stripes using a mower with a rear roller that pushes the grass blades backwards and forwards. Or you can use a brush for a smaller area.
How can I keep my lawn healthy?
A healthy lawn is a happy lawn that can be enjoyed year after year. Keeping your lawn healthy doesn’t have to be a difficult job. Completing smaller tasks more regularly can mean that you won’t have as many jobs to do when summer arrives. Keep reading for our six steps to keep your lawn healthy and in good condition.
Pests
What are leatherjackets?
Unless you’ve had them before, it’s highly unlikely that you happen to know what leatherjackets bug is, and you probably don't know how to get rid of them either. In short, they’re grey and mousy brown grubs that eat at the roots of your grass, causing it to die off. They go mostly unnoticed as they begin their lives as eggs laid by crane flies (daddy long legs), and it takes a perfect storm of hot and wet weather to cause them to hatch. This happens in random patches because only some crane fly eggs will hatch, and once fully grown at the larvae stage; they will begin to eat the grass around them.
How do I get rid of leatherjackets?
You won’t find the cure on supermarket shelves as the solution is actually a living one. Nematodes are microscopic (teeny tiny!) bacterial worms that can kill off leatherjackets, and because of this, they actually need to be refrigerated when purchased. Think of them like sea-monkeys for adults! When mixed with water and sprayed on the affected area, they’ll set to work killing off the leatherjackets in your lawn. With any product, make sure to read the instructions carefully and follow every step.
How can I repair leatherjacket damage?
Once you’re confident your visitors are gone, you can set about repairing the damage they’ve left. Depending on how long they’ve been terrorising your lawn, there are two options you can consider - keep reading for our guide on how to repair leatherjacket damage.
What are chafer grubs?
Just as unhelpful as leatherjackets, chafer grubs eat away at the roots of your grass, causing the blades to yellow/brown from the bottom up. This also weakens your grass, so if chafer grubs have moved into your lawn, you will be able to pull away parts of your grass easily. The same rules apply, and by pulling back the turf in your lawn, you’ll be able to check if these greedy grass grubs have invited themselves to your garden party.
How do I get rid of chafer grubs?
Chafer grubs eat away at the roots of your grass causing the blades to yellow / brown from the bottom up. This also weakens your grass, so if chafer grubs have moved into your lawn you will be able to pull away parts of your grass easily. Same rules apply, and by pulling back the turf in your lawn you’ll be able to check if these greedy grass grubs have invited themselves to your garden party. Just like leatherjackets, chafer grubs can be treated with the same Nemasys product – as said, make sure to read the instructions before use.
What can I do about wormcasts on my lawn?
Most people recognise that worms in your soil are a good thing and are a sign of a healthy lawn (and they’re correct!) – worms help to improve the drainage in your lawn (less flooding) and are also great at recycling the nutrients within your soil. Unfortunately, worms get a little full up eating all those nutrients and may decide to hit the eject button on your lawn, leaving worm casts on the surface.
What can I do about moles on my lawn?
Whilst worms may create a little pile of soil on your lawn, moles will make their presence known by leaving a massive one! Before a mound appears you may notice ridge patterns in your lawn that are a sign that moles are tunnelling underneath the surface. This may make your lawn surface uneven, and while moles can certainly be a nuisance - they are ultimately harmless and are also a protected species.
What can I do about ants in my lawn?
If you find small heaps of soil appearing on top of your lawn leaving you scratching your head, you may discover that you have ants in your lawn. Now, ants are probably one of the last pests you would be worried about and aside from these heaps of soil they won’t be much trouble. If the ants are ruining your lawn aesthetic, you can brush the soil mounds out on a dry day to be level with the rest of your lawn. If you have children or pets and are concerned that some of the ants in your lawn might be harmful contact an ant specialist and do not attempt to remove the ants yourself.
Dog Pee Patches
What causes dog pee patches?
Dog pee contains a chemical called Nitrogen, which, although found in lawn food to make your grass green, will cause your lawn to go patchy when your pup keeps going to the bathroom in the same area!
How do I repair dog pee patches?
Step 1: Remove the affected grass by digging it out
Step 2: Use topsoil to fill in where the grass has been removed. Do not use compost in this area
Step 3: Sprinkle our Tough Stuff Lush Lawn on top
Step 4: Keep the repaired patch moist for six weeks after sowing by watering every day; if rainfall occurs, you can skip this step
How can I prevent dog pee patches?
You can avoid burnt grass patches by firstly watering your lawn after your dog uses it. This will help lessen nitrogen's effect and keep your grass from burning. The best way to do this is by using a garden hose or a watering can – it is unlikely that a sprinkler will water these patches enough to reduce the chance of burning. You can also cordon off an area for your dog to use regularly. You may find that certain products like dog rocks are suggested for reducing dog urine burn patches, but we recommend consulting your vet first before taking any action.
What seed should I use to repair dog pee patches?
At icanlawn.com, we believe honesty is the best policy – so we won’t tell you that dog-resistant grass exists! Your best course of action for avoiding burnt pee patches on your lawn is to water them right away. Of course, this takes a little extra effort, but your lawn will thank you for it in the long run – and it also saves you from having to do any patch repairs!
Weeds, Weed Grasses & Moss
How do I get rid of weeds and moss?
Weeds and moss can appear on your lawn at any time. Even the best cared-for lawn can have the odd weed. Thankfully, weeds and moss can be removed easily and in various ways!
The easiest way to learn how to get rid of weeds and moss is to check out our video guide on removing moss.
Dig the soil to remove roots
If your lawn has only a few weeds, these can be dug up using a garden trowel, making sure to remove all roots. Or you can use a selective weedkiller to target these directly.
Scarify or rake the soil to remove moss
Scarifying or raking the soil using a rake or electric scarifier can help remove moss – this may be a temporary solution if your lawn is vulnerable to moss due to shade or water retention.
Removing using Feed, Weed and Mosskiller
An alternative way to remove both weeds and moss that appear throughout your lawn is to use a Feed Weed and Moss Killer product, such as our 3 IN 1 Lawn Rescue.
To keep both weeds and moss at bay, take action as they begin to appear. You can also keep your lawn healthy by regularly feeding it.
How do I get rid of weed grasses in my lawn?
Weed grasses appear like grasses but are invasive weeds. If you have weed grasses present in your lawn, you will notice thick clumps of broad-leafed grass that don’t quite fit in with the rest. Removing any sign of thicker grasses or weeds when they appear can stop them from becoming a huge problem, and a healthier lawn that is well looked after will be in a better position to fend them off. Feeding and overseeding your lawn helps to create a strong grass root system and a thick, dense lawn leaving little room for weeds to creep in.
How do I get rid of weeds in my lawn?
Even the best cared-for lawn can show signs of weeds sprouting without warning. Weeds appearing can be even more surprising when you have done all the prep work when sowing your grass seeds. However, controlling these unexpected visitors is not difficult! So, keep reading and discover a few easy ways to remove weeds and moss from your newly seeded lawn.
How do I get rid of moss in my lawn?
Of all the pesky lawn diseases and weeds that can crop up on our lawns, moss is one of the most common. Unless your soil conditions are perfect, it’s likely that moss will make an appearance on your lawn at some stage.
Mosses are very shallow-rooted plants, so luckily, immediate removal is pretty easy. A simple 3 step process will help to kill dead moss and remove it from your lawn.
How do I get rid of weeds in my new lawn?
Controlling weeds in a newly seeded lawn can seem daunting, mainly when you've carried out all the necessary pre-sowing steps before planting your grass seed. We know it can be frustrating when new weeds start growing among your fresh new grass, but don't rush to what seems like the easiest solution - you don't need to use weed killers just yet!
Grass Diseases & Fungi
What is red thread and how can I get rid of it?
What is red thread?
Red thread is a common lawn disease that will appear across many UK lawns and thrives in hot and wet weather, which encourages the red thread fungus to grow. Whilst you can see red thread year-round, it is most common when we experience wet summers and autumns. In autumn, dead grass and moss can begin to gather on your lawn. This allows moisture to build up on the surface of your lawn and creates the perfect breeding ground for red thread.
How do I get rid of red thread grass disease?
Using a nitrogen-rich lawn food such as our Oh So Green will help to turn your red grass blades back to green again. Lawns that suffer from red thread are often low in nitrogen or haven’t been fed at all, so keep on top of this to prevent future red thread and other lawn diseases.
What is damping off and how can I get rid of it?
Damping off can occur if you have recently sown a new lawn or overseeded your existing lawn. Similar to Red Thread, it can take hold of your lawn when weather conditions are humid with heavy rainfall, creating a hot bed for fungi to grow and multiply. This particular disease can cause emerging seedlings to collapse or never to emerge at all.
Although this can occur at different times of year, it is most likely to happen in spring. Whilst there is no cure for Damping Off besides removal of the dead seedlings and starting from scratch again, you can help to prevent it by ensuring you sow / overseed your lawn in the right weather conditions. This means sowing when temperatures are 10 degrees and above, with no extreme weather conditions (floods, snow, frost or heatwaves) forecast for the first two weeks post-sowing.
What is snow mould and how can I get rid of it?
As its name suggests, Snow Mould is most likely to occur in the winter months. If snow lingers on your lawn for too long, it can cause fungi to grow, encouraging yellow – brown spots to develop on your lawn. It can be difficult to control, so the best course of action here is prevention. If you have prolonged snowfall on your lawn for a number of days, you should aim to shovel it off in sections so that when it begins to melt, the moisture isn’t returning to your grass, encouraging more fungi to grow.
How can I get rid of mushrooms in my lawn?
You may have noticed mushrooms growing on your lawn but haven’t seen any other gardens on your street plagued with these unsightly fungi – why is this? We’re here to provide advice on what causes mushrooms to grow in your garden and how to get rid of mushrooms on a lawn in the UK!
The best way to get rid of mushrooms in a lawn is prevention. By keeping an eye on your grass and soil conditions, you can be a step ahead of the mushrooms and stop their growth completely. Some soil types drain better than others, and some are more likely to hold water - we have a guide on soil types if you are unsure what kind of soil your garden has. As we also mentioned before, mushrooms feast on organic matter in your garden, so by removing grass cuttings, leaves, sticks, and twigs, you will reduce their food source.
If you’ve caught them late and the mushrooms have sprouted up without you noticing, the best thing to do is pull them out from the base of their stem as soon as possible! Removing them this way will also eliminate the risk of children or animals eating them and getting sick.
Short grass dries out faster than long grass, so mow your lawn regularly (once a week in spring and summer) to limit the quantity of water available for the mushrooms. Also, be sure to remove all grass cuttings after mowing to restrict the amount of food the mushrooms have to feed on!
Ask a Question
Have a question you need help with? Enter it below and one of our team will aim to back to you within 24 hours.